Trillium electric water pump

Adding an electric water pump
Our Trillium is great, it has a three way fridge, a two burner stove, a furnace, and a sink with two spouts - one for city water and one with a hand pump that draws from a water storage tank.
Have you ever tried drawing enough water to wash dishes (or make tea) with a hand pump? What a pain in the @$$.
In the more deluxo trailers they have an automatic water pump that turns on when you open the water tap. That's great, but I can have water when my battery is dead. So blah.
Alright, I figured out how to have automatic water AND keep the hand pump AND be able to use city water, all at the appropriate times.
This project would be considered about 8 out of 10 on the difficulty scale. You will be slicing hoses, playing inside the power converter, undoing gas connections, removing the furnace, gluing stuff down, and running low voltage electrical, all within the confined space of a Trillium 1300.
Here's what you need:
-
•Shurflo Classic Pump # 2088-422-444 (Your local RV parts dealer - about $130CDN)
-
•An inline fuse holder (Active Components)
-
•Some 10 amp slow blow fuses to fit the holder (Active Components)
-
•An on/off toggle switch (Active Components)
-
•About 6 feet of 16 gauge stranded wire, one black and one white (Active Components)
-
•About 4 feet of 1/2" ID high pressure vinyl hose (Revy/Home Depot)
-
•Two 1/2-1/2-1/2 brass T connectors (Revy/Home Depot)
-
•8 jubilee clips that will go onto the hose (Revy/Home Depot)
-
•A piece of plywood about 8" x 6" x 5/8" (Your scrap pile)
-
•4 x 1" long #8 stainless steel wood screws
-
•4 x #8 stainless steel flat washers
-
•Some epoxy
-
•Small bits like small shrink tubing, soldering pencil, solder
The big theory
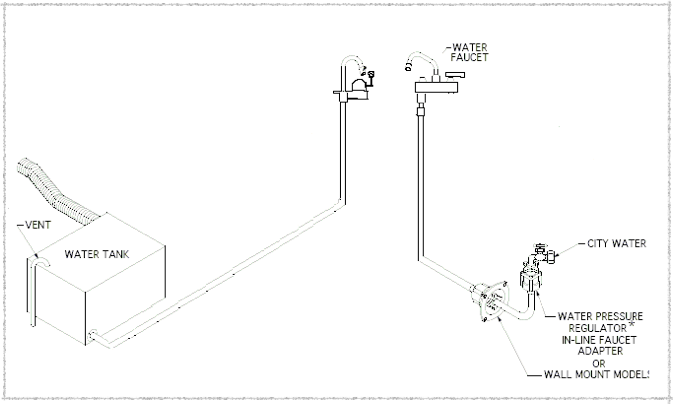
The hand pump sucks water out of the water storage tank through a 3/8" ID hose running from the bottom of the tank (located under the door side rear gunnel) under the floor and up to the pump located on the back of the sink.
The city water connection has a connection on the outside of the trailer containing a check valve (so the water doesn't shoot out when the hose is disconnected) through a 3/8" ID high pressure hose up to the other tap on the back of the sink.
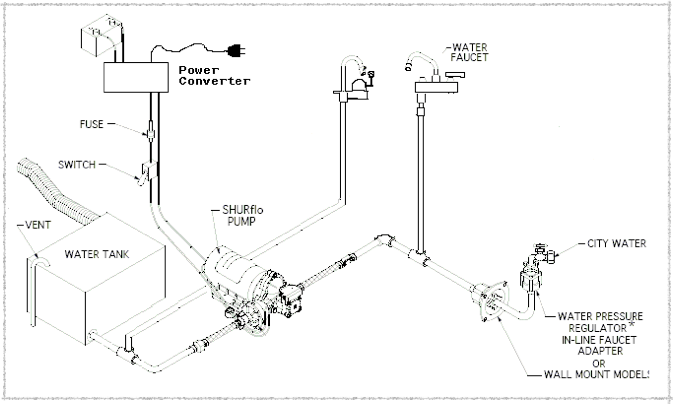
What we are going to do is put the pump between the city water connection hose and the hand pump connection hose. The pump will have it's input on the water tank/hand pump side and its output on the city water side.
The pump outlet is connected to the city water connection hose using a T connector. Either city water or the pump can be used just by opening the city water tap on the sink.
The pump contains a check valve so that when you are using city water, the valve keeps water from flowing backwards to fill the tank.
The pump contains a pressure switch that turns the pump on when the output pressure drops when you open the tap. When using city water, the city water will keep the pressure up and the pump will not run.
The pump inlet is connected to the water tank using a T connector. When the pump is not being used (because your battery went dead) you can still use the hand pump.
So, this is what the system looks like before we start:
And this is what it looks like when we are done:
Test to see if the pump works
Hook the pump's black wire to the negative pole of your 12V battery and the red wire to the positive pole. The pump should start.
Next, cut the vinyl hose in half and connect each half to one of the barb/screw connectors that came with the pump. Attach the barb/screw connectors to the pump, place the ends of the hoses into a container of drinkable water and run the pump. The water should get sucked up by one hose and shot out by the other.
Block the output hose, the pump should stop (or at least slow down while it leaks).
If the pump doesn't pump, check the battery first.
If there is a problem, take the pump back, that's a lot of money for something that doesn't work. The pump that I got had water in it...hmmm I think I got a return unit. Perhaps a disinfection run is a good idea after we are done.
Assemble the system
The system will end up living in the gunnel at the rear, sink side corner. This is where the hoses for the water come together and the electricity is close at hand.
Electrical
The pump has a red wire being positive and a black wire being negative, the trailer uses black for positive and white for negative (ground).
-
1.Attach the switch to the red wire, solder it or crimp it, then protect the connection.
-
2.Attach the other side of the switch to the fuse holder and protect the connection.
-
3.Attach the other side of the fuse holder to the length of black wire and protect the connection.
-
4.Attach the length of white wire to the pump's black wire and protect the connection.
-
5.Test the system to see if it all works so far.
Mounting
The pump is mounted to the plywood with the four stainless wood screws and washers. Why stainless? Water + wood + time = rust for regular galvanized screws. We only want to do this once. Mount the pump to the board in such a way that any leakage will go toward a drain hole.
Mix up some epoxy and spread it liberally onto the board. Mount the board, with the pump, to the floor of the trailer, in the gunnel, on a nice flat bit.
Water
Test fit everything before you hack stuff up.
Find the hose running from the water tank to the manual pump. Find a convenient place to cut it to install a T piece and hook it to the input to the pump. The hose can be stretched using really hot water. Use the hose clamps to make the connections permanent.
Find the hose running from the city water connection to the city water tap. Find a convenient place to cut it to install a T piece and hook it to the output of the pump. The hose can be stretched using really hot water. Use the hose clamps to make the connections permanent.
Final electrical hookup
The electrical connection is tied into the power converter. The power converter is that odd device under the sink that takes 110Volt AC shore power and converts it into 12Volt DC to run the interior lights. There is a switch on the power converter that switches the 12Volts from the converter's transformer to feed directly from the battery. This is where we will tie in.
REMOVE ALL POWER FROM THE TRAILER. BOTH SHORE POWER AND BATTERY POWER.
One side of the power converter has the 110Volt shore power. On my trailer, Trillium used PVC jacketed house wire. This is also where the shore power cable comes in. Danger danger, you did remember to unplug it, didn't you?
On the other side of the power converter is the 12Volt converter output, the 12Volt lines from the battery, and the lines going out to the interior lights.
DISCONNECT THE PROPANE SUPPLY BOTTLES.
Remove the furnace, exposing the top of the power converter. This procedure requires disconnecting the gas connection. Open the pilot access hatch of the furnace. Remove the screws that hold the front cover on. Disconnect the gas connection to the control valve. Remove the front cover. Remove the screws that fasten the furnace to the counter. Wiggle and pull the furnace until the chimney is disconnected and the furnace comes out. Put it somewhere convenient.
Remove the face of the power converter, exposing the guts of the converter. High power on the left, low power on the right.
Fish the black and white pump wires through the top of the power converter box on the low power side.
Figure out which are the lines going out to the interior lights. On my trailer these connections were made using screw-on connectors. Connect in the pump wires, white to white, black to black, no sparky sparky.
Carefully put the converter back together. The converter has two barrier walls that can pinch the wires causing a short circuit, sparks, and fire. Carefully put the converter back together.
Hook up the battery and test the pump.
Reinstall the furnace.
Button everything back up.
Go buy yourself a beer.